Adding custom domain in blogger is easy compare to other platforms. Big rock provides easy interface which is easily understandable for new users. After running sub domain successfully every blogger aims to buy the custom domain as it is easy way to identify. You can add any custom domain refers to any country or commercial domain.

Blogger provides free hosting and also it is owned by google. Due to that the brand of blogger is always glow in the blogging world. According to custom domains make possible to identify and also give good way of improving traffic from google and also from other search engines. After purchasing the custom domain in bigrock and after setting up all the preferences now you can add the domain in blogger.
Steps to add custom domain in blogger
Steps to add custom domain in blogger
- First login to the bigrock and after that you will be redirected to your account dashboard.
- After that just click on manage orders and then click list of orders. After that the list of domains which are available in your dashboard will be displayed.
- Next that click on the domain which is one you want to add it in blogger as you can see in the below image.

- A new window will be displayed and scroll down till you find the DNS Management.
- Under the DNS Management click the Manage DNS .

- You will be redirected to the new window named A Records by default.
- Click on Add A Record button as shown in the below image.

- As shown in the below image just leave Host Name blank and add 216.239.32.21 in Destination IPv4 address.Just remain 28800 in TTL without any change. And click add record.

- After adding just follow the same way to add the other 3 A Records by adding the Destination ipv4 address like
216.239.34.21
216.239.36.21
216.239.38.21
- Remember there are total 4 a records in total as shown in the below image.

- After adding the A records successful now you should add the CNAME Records.
- Now click the CNAME RECORDS and then click add CNAME RECORD.
- In the host name enter WWW and in the value choose second radio option and click add record.

Domain Setup And Blog Verification in Blogger
- After adding A Records and CNAME Records. Now go to Blogger Now select the blog which you want to add the custom domain.
- After selecting your blog you will be redirected to your blogger dashboard.

- In your blogger dashboard click on settings and then click setup third party to add the custom domain.

- Now add the domain name and click on save button and you will be alert a warning this is because you have to add the record in the CNAME records which is marked.
- You won’t need to add the WWW and ghs.google.com as it is already added so add the second record only.
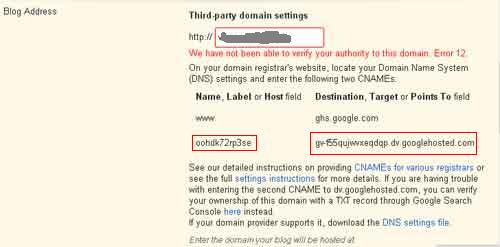
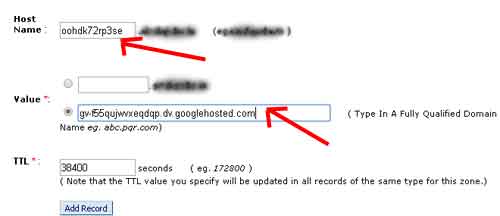
- Now go to CNAME records and add the first one in the Host name field and second one in the value in the second radio button field and then click add record.
- After adding successfully it will take 2 to 4 hours time for verification process to update the DNS settings for your domain.
- Then at last go to blogger dashboard SETTINGS>Basic>Now click save and also tick the redirect to the domain so that it will be properly configured.

 About Vijaykumar


Perhaps this is one of the best company for providing hosting in India, but if you are premium hosting then you need to check wiredtree because this company is the leader in this, get wiredTree Hybrid coupon
ReplyDelete