Use of custom permalink feature in your blogger(blogSpot) blog makes easier for search engines to find your blog posts quickly. Using of this custom permalink feature makes to create your own short words in permalink instead of generating long permalinks. You must able to know about the custom permalinks if you want to get good results from Google for better SEO. This is one of the major on-page best practices which you should use for your every post.
What is Custom Permalink?
Normal permalinks:
These permalinks are generated from the blog post title instead of adding by our own. It means the permalinks are normally called for your post title without your suggestion. The below example link shows how normal permalink is generated without your suggestion.
"http://www.bloggingwala.com/2015/07/easy-way-to-find-imei-number-of-your.html"
Custom permalinks:
These types of permalinks are created by your own suggestion I mean if you want to use the custom permalinks for your blog post then there is an option in your blog post which I will describe below. View the below example of custom permalink
"http://www.bloggingwala.com/2016/07/recover-deleted-webpages.html"
After viewing above you have got an idea what are the normal and custom permalinks right. According to the below 2 methods the custom permalinks is best because Google crawls custom permalinks fast because when ever an user searches any query it will be in short and also Google displays the top results which have short permalinks. So you may come to know why custom permalink is better to use and also can give good results in search engine.
How to use custom permalinks for your Blogger blog?
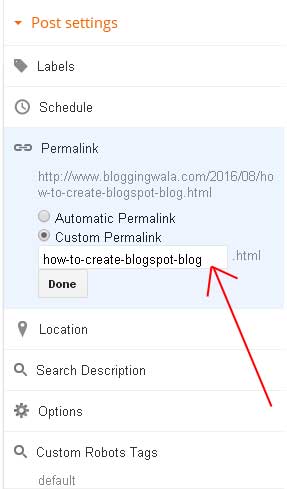
Custom permalinks option is available in every post in blogger but once you publish your post you can’t able to edit your permalink again. If you are new then want to use how permalinks work then first go to your blogger dashboard and click on new post and after adding the post title you are ready to add the custom permalinks it is at the right side of your post. Click on Post Settings-> Links -> Add your own custom permalink.
To use custom permalink for your every blog post you should know about keyword research. The researching high quality keywords using google keyword planner and Google trends makes you easy to find hot keywords which appear in search engine.
Every time keyword research wont’ win your game because the post keywords which not available every time in the keyword planner. So just you should learn how to use short words in your permalinks. Mainly newbies make mistake to use the normal permalinks and also not able to find the right keywords for your posts. Simply I will explain how you can use custom permalinks for your blog posts.
Here we go for example your blog post generated normal permalink like this
"www.example.blogspot.com/yy/mm/how-to-create-your-free-blog-in-blogger-blogspot.html"
The above one is generated normally so we can change to the custom permalink like how-to-create-BlogSpot-blog which is able to crawl easily by google and other search engines.
Presently you can use [-][_] [A-Z][a-z][0-1] characters in the custom permalink but my suggestion is don’t use underscore in custom permalinks it is not an good option.
vijaykumar
at August 06, 2016
Use of custom permalink feature in your blogger(blogSpot) blog makes easier for search engines to find your blog posts quickly. Using of this custom permalink feature makes to create your own short words in permalink instead of generating long permalinks. You must able to know about the custom permalinks if you want to get good results from Google for better SEO. This is one of the major on-page best practices which you should use for your every post.
What is Custom Permalink?
Normal permalinks:
These permalinks are generated from the blog post title instead of adding by our own. It means the permalinks are normally called for your post title without your suggestion. The below example link shows how normal permalink is generated without your suggestion.
"http://www.bloggingwala.com/2015/07/easy-way-to-find-imei-number-of-your.html"
Custom permalinks:
These types of permalinks are created by your own suggestion I mean if you want to use the custom permalinks for your blog post then there is an option in your blog post which I will describe below. View the below example of custom permalink
"http://www.bloggingwala.com/2016/07/recover-deleted-webpages.html"
After viewing above you have got an idea what are the normal and custom permalinks right. According to the below 2 methods the custom permalinks is best because Google crawls custom permalinks fast because when ever an user searches any query it will be in short and also Google displays the top results which have short permalinks. So you may come to know why custom permalink is better to use and also can give good results in search engine.
How to use custom permalinks for your Blogger blog?
Custom permalinks option is available in every post in blogger but once you publish your post you can’t able to edit your permalink again. If you are new then want to use how permalinks work then first go to your blogger dashboard and click on new post and after adding the post title you are ready to add the custom permalinks it is at the right side of your post. Click on Post Settings-> Links -> Add your own custom permalink.
To use custom permalink for your every blog post you should know about keyword research. The researching high quality keywords using google keyword planner and Google trends makes you easy to find hot keywords which appear in search engine.
Every time keyword research wont’ win your game because the post keywords which not available every time in the keyword planner. So just you should learn how to use short words in your permalinks. Mainly newbies make mistake to use the normal permalinks and also not able to find the right keywords for your posts. Simply I will explain how you can use custom permalinks for your blog posts.
Here we go for example your blog post generated normal permalink like this
"www.example.blogspot.com/yy/mm/how-to-create-your-free-blog-in-blogger-blogspot.html"
The above one is generated normally so we can change to the custom permalink like how-to-create-BlogSpot-blog which is able to crawl easily by google and other search engines.
Presently you can use [-][_] [A-Z][a-z][0-1] characters in the custom permalink but my suggestion is don’t use underscore in custom permalinks it is not an good option.
Easily add CSS(Cascading Style Sheets) to your blogger template without affecting the code of your template in blogger. You can insert the CSS code using template designer present in the blogger dashboard. Firstly CSS make your blog stylish and mainly the site designed in blogger will designed beautifully with CSS codes. So these style codes play important part in blogger template.
CSS codes are not always implemented correctly or executed correctly before <head> tag. Because some custom designed templates may not properly take the CSS codes which are executed in the ]]></b:skin>. And some may also won’t have knowledge of adding the CSS codes in the editor. And they may face difficulties in finding the ]]></b:skin> tag . Without using the editor you can add the CSS codes the inbuilt function known as template designer is available in blogger dashboard.
Adding CSS To Blogger Using Template Designer
- Go to blogger dashboard and choose the blog which you want to add the css code.
- First select template and then click customize button to add the css code.

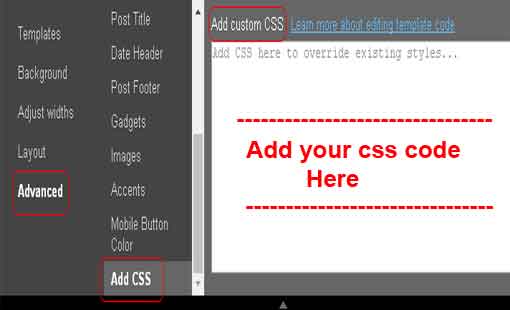
- A Window will be displayed in that click advanced.
- Next to advanced just scroll to the bottom you can view the add css code click that and add your custom css code which is at the right side in the add custom css tab. Don’t put your css styles between <style type=”text/css”> </style> tags because by taking advantage of this feature the new css styles will go directly above the </head> tag.
Conclusion:
By the above method you can only add the new CSS styles to your blog but
you can’t edit the existing CSS codes which are in your template. If
you want to edit the existing CSS you should navigate to the template
editor but it takes some time to edit and also it is risky if you don’t
know about coding. It is not hard but you should know little part of
coding to use template editor in blogger.
vijaykumar
at August 03, 2016
Easily add CSS(Cascading Style Sheets) to your blogger template without affecting the code of your template in blogger. You can insert the CSS code using template designer present in the blogger dashboard. Firstly CSS make your blog stylish and mainly the site designed in blogger will designed beautifully with CSS codes. So these style codes play important part in blogger template.
CSS codes are not always implemented correctly or executed correctly before <head> tag. Because some custom designed templates may not properly take the CSS codes which are executed in the ]]></b:skin>. And some may also won’t have knowledge of adding the CSS codes in the editor. And they may face difficulties in finding the ]]></b:skin> tag . Without using the editor you can add the CSS codes the inbuilt function known as template designer is available in blogger dashboard.
Adding CSS To Blogger Using Template Designer
- Go to blogger dashboard and choose the blog which you want to add the css code.
- First select template and then click customize button to add the css code.
- A Window will be displayed in that click advanced.
- Next to advanced just scroll to the bottom you can view the add css code click that and add your custom css code which is at the right side in the add custom css tab. Don’t put your css styles between <style type=”text/css”> </style> tags because by taking advantage of this feature the new css styles will go directly above the </head> tag.
Conclusion:
By the above method you can only add the new CSS styles to your blog but
you can’t edit the existing CSS codes which are in your template. If
you want to edit the existing CSS you should navigate to the template
editor but it takes some time to edit and also it is risky if you don’t
know about coding. It is not hard but you should know little part of
coding to use template editor in blogger.
Adding custom domain in blogger is easy compare to other platforms. Big rock provides easy interface which is easily understandable for new users. After running sub domain successfully every blogger aims to buy the custom domain as it is easy way to identify. You can add any custom domain refers to any country or commercial domain.
Blogger provides free hosting and also it is owned by google. Due to that the brand of blogger is always glow in the blogging world. According to custom domains make possible to identify and also give good way of improving traffic from google and also from other search engines. After purchasing the custom domain in bigrock and after setting up all the preferences now you can add the domain in blogger.
Steps to add custom domain in blogger
- First login to the bigrock and after that you will be redirected to your account dashboard.
- After that just click on manage orders and then click list of orders. After that the list of domains which are available in your dashboard will be displayed.
- Next that click on the domain which is one you want to add it in blogger as you can see in the below image.
- A new window will be displayed and scroll down till you find the DNS Management.
- Under the DNS Management click the Manage DNS .
- You will be redirected to the new window named A Records by default.
- Click on Add A Record button as shown in the below image.
- As shown in the below image just leave Host Name blank and add 216.239.32.21 in Destination IPv4 address.Just remain 28800 in TTL without any change. And click add record.
- After adding just follow the same way to add the other 3 A Records by adding the Destination ipv4 address like
216.239.34.21
216.239.36.21
216.239.38.21
- Remember there are total 4 a records in total as shown in the below image.
- After adding the A records successful now you should add the CNAME Records.
- Now click the CNAME RECORDS and then click add CNAME RECORD.
- In the host name enter WWW and in the value choose second radio option and click add record.
Domain Setup And Blog Verification in Blogger
- After adding A Records and CNAME Records. Now go to Blogger Now select the blog which you want to add the custom domain.
- After selecting your blog you will be redirected to your blogger dashboard.
- In your blogger dashboard click on settings and then click setup third party to add the custom domain.
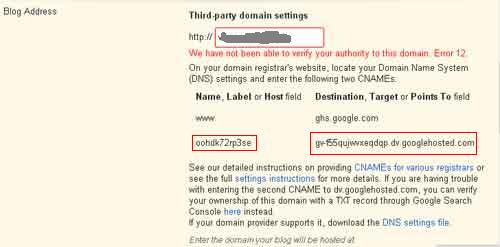
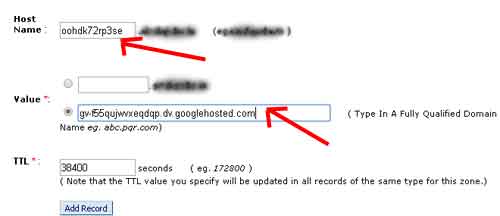
- Now add the domain name and click on save button and you will be alert a warning this is because you have to add the record in the CNAME records which is marked.
- You won’t need to add the WWW and ghs.google.com as it is already added so add the second record only.
- Now go to CNAME records and add the first one in the Host name field and second one in the value in the second radio button field and then click add record.
- After adding successfully it will take 2 to 4 hours time for verification process to update the DNS settings for your domain.
- Then at last go to blogger dashboard SETTINGS>Basic>Now click save and also tick the redirect to the domain so that it will be properly configured.
Conclusion:
Follow the steps carefully to add the custom domain in blogger. After adding the domain in blogger it takes some times to verify your domain. According to bigrock it is easy and friendly dashboard helps to add the domain in blogger. While compare to other domain registrars bigrock provides easy and friendly user interface.
vijaykumar
at July 19, 2016
Adding custom domain in blogger is easy compare to other platforms. Big rock provides easy interface which is easily understandable for new users. After running sub domain successfully every blogger aims to buy the custom domain as it is easy way to identify. You can add any custom domain refers to any country or commercial domain.
Blogger provides free hosting and also it is owned by google. Due to that the brand of blogger is always glow in the blogging world. According to custom domains make possible to identify and also give good way of improving traffic from google and also from other search engines. After purchasing the custom domain in bigrock and after setting up all the preferences now you can add the domain in blogger.
Steps to add custom domain in blogger
- First login to the bigrock and after that you will be redirected to your account dashboard.
- After that just click on manage orders and then click list of orders. After that the list of domains which are available in your dashboard will be displayed.
- Next that click on the domain which is one you want to add it in blogger as you can see in the below image.
- A new window will be displayed and scroll down till you find the DNS Management.
- Under the DNS Management click the Manage DNS .
- You will be redirected to the new window named A Records by default.
- Click on Add A Record button as shown in the below image.
- As shown in the below image just leave Host Name blank and add 216.239.32.21 in Destination IPv4 address.Just remain 28800 in TTL without any change. And click add record.
- After adding just follow the same way to add the other 3 A Records by adding the Destination ipv4 address like
216.239.34.21
216.239.36.21
216.239.38.21
- Remember there are total 4 a records in total as shown in the below image.
- After adding the A records successful now you should add the CNAME Records.
- Now click the CNAME RECORDS and then click add CNAME RECORD.
- In the host name enter WWW and in the value choose second radio option and click add record.
Domain Setup And Blog Verification in Blogger
- After adding A Records and CNAME Records. Now go to Blogger Now select the blog which you want to add the custom domain.
- After selecting your blog you will be redirected to your blogger dashboard.
- In your blogger dashboard click on settings and then click setup third party to add the custom domain.
- Now add the domain name and click on save button and you will be alert a warning this is because you have to add the record in the CNAME records which is marked.
- You won’t need to add the WWW and ghs.google.com as it is already added so add the second record only.
- Now go to CNAME records and add the first one in the Host name field and second one in the value in the second radio button field and then click add record.
- After adding successfully it will take 2 to 4 hours time for verification process to update the DNS settings for your domain.
- Then at last go to blogger dashboard SETTINGS>Basic>Now click save and also tick the redirect to the domain so that it will be properly configured.
Conclusion:
Follow the steps carefully to add the custom domain in blogger. After adding the domain in blogger it takes some times to verify your domain. According to bigrock it is easy and friendly dashboard helps to add the domain in blogger. While compare to other domain registrars bigrock provides easy and friendly user interface.
You can easily recover the deleted or lost WebPages by using the methods which I will explain below. If you visit any page it might be deleted by author or some times you will might have been deleted your own blog posts. And if you have added any code to your blog or any other migration issues your blog may lost some pages so for this purpose you can use the below 2 methods which are useful in recovering the deleted WebPages.
Steps to Recover Deleted WebPages
There are 2 proven methods to recover the deleted or lost WebPages. Follow the below 2 methods which is useful to recover the WebPages.
1st Method (cached WebPages in search engine)
Type or paste the post link in Google and click cache button and you might be able to see the webpage even the post is deleted. If you are searching for deleted webpage which posts monthly or weekly you can even view the post after many days but if the webpage is updated for every hour for example forums like stack overflow it is cached but after 24 hours it might be deleted from the cache also.
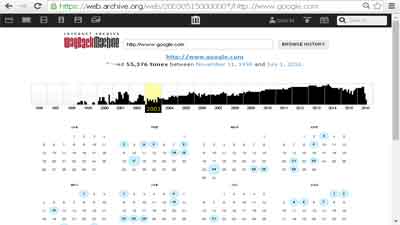
2nd Method (Internet archive)
Go to Google and type internet archive.
After opening internet archive site now you can search the webpage which you want to recover.
You can view the detailed list with dates which the webpage is cached.
Next you can click any of the date and make sure that you should correctly recover the deleted webpage based on the dates provided in the list.
Conclusion:
So to recover the lost or deleted webpage above are the proven methods you can easily recover any webpage link but you cannot recover the social media sites because these social media sites may have blocked accessing the history through robots.txt files. These methods are useful for various ways to recover the deleted images, links etc.
vijaykumar
at July 15, 2016
You can easily recover the deleted or lost WebPages by using the methods which I will explain below. If you visit any page it might be deleted by author or some times you will might have been deleted your own blog posts. And if you have added any code to your blog or any other migration issues your blog may lost some pages so for this purpose you can use the below 2 methods which are useful in recovering the deleted WebPages.
Steps to Recover Deleted WebPages
There are 2 proven methods to recover the deleted or lost WebPages. Follow the below 2 methods which is useful to recover the WebPages.
1st Method (cached WebPages in search engine)
Type or paste the post link in Google and click cache button and you might be able to see the webpage even the post is deleted. If you are searching for deleted webpage which posts monthly or weekly you can even view the post after many days but if the webpage is updated for every hour for example forums like stack overflow it is cached but after 24 hours it might be deleted from the cache also.
2nd Method (Internet archive)
Go to Google and type internet archive.
After opening internet archive site now you can search the webpage which you want to recover.
You can view the detailed list with dates which the webpage is cached.
Next you can click any of the date and make sure that you should correctly recover the deleted webpage based on the dates provided in the list.
Conclusion:
So to recover the lost or deleted webpage above are the proven methods you can easily recover any webpage link but you cannot recover the social media sites because these social media sites may have blocked accessing the history through robots.txt files. These methods are useful for various ways to recover the deleted images, links etc.
After 3 years of my blogging career iam writing article on which blogging platform is better for blogging. Blogger vs wordpress which is the best platform today for blogging? This is the question asked by many new blogger who want to create a free blog or custom domain. In this article i'am writing about the pros and cons and also differences about blogger and wordpress. Read this complete article and find out which is best blogging platform for you to make your first ever blog.
Today many users are creating blogs on wordpress because the wordpress has better features like plugins, themes which are well developed and also available in large number. After using blogger platform I can say that blogger is easy to navigate. New users who use BlogSpot can feel friendly to use and also they can manage other programming things like editing the code in editor and can create their own third party widgets.
Blogger VS wordpress: which blogging platform is better?
Users who are new and want to create blog first they should create on blogger. As it provides good user friendly interface like coming to layout it is good to insert the widget or can also add the third party code into the layout it is easy task to implement.Also if you increase your like on languages like HTML, CSS and JavaScript you can play it with blogger where as in wordpress the beginners not able to code as it is coded with php script. If you want to save money on hosting then use BlogSpot platform, as the hosting in BlogSpot platform is completely free only thing is you should buy custom domain and link it to the blogger through the dashboard.
|
|
|
|
|
Free To Create Sub domains like
(example.blogspot.com)
|
Free To Create Sub domains
like (example.wordpress.com)
|
Coding in Editor is easy( only
need to have basics in HTML, CSS & javascript)
|
Coding in editor is difficult unless if you have good coding skills
like PHP
|
Support form is there but limited members are available .
|
Support form with large number of members can get solution with in
minutes.
|
Widgets(Limited no of widgets)
|
Plugins(large number of widgets)
|
We can create Third party widgets
|
In wordpress also we create own plugins and we can add
|
Right choice for new users
|
Perfect Choice for users who already used blogger platform and want
to do real business
|
Easy way to add custom domain
through the dashboard.
|
Not an easy task for new users who want to add new domain with
wordpress
|
Conclusion:
Every user who uses internet want to create the blog on BlogSpot or wordpress but for newbies the BlogSpot is better if you want to make real business then wordpress is best as it has bunch of features. Choice is yours but if you are blogging for the first time then you should touch BlogSpot blog once then you know how the blog looks and then you can do migration it to wordpress. BlogSpot is also great platform for blogging but it has limited features. If it is wordpress or BlogSpot you can create your own sub domain for free.
vijaykumar
at June 16, 2016
After 3 years of my blogging career iam writing article on which blogging platform is better for blogging. Blogger vs wordpress which is the best platform today for blogging? This is the question asked by many new blogger who want to create a free blog or custom domain. In this article i'am writing about the pros and cons and also differences about blogger and wordpress. Read this complete article and find out which is best blogging platform for you to make your first ever blog.
Today many users are creating blogs on wordpress because the wordpress has better features like plugins, themes which are well developed and also available in large number. After using blogger platform I can say that blogger is easy to navigate. New users who use BlogSpot can feel friendly to use and also they can manage other programming things like editing the code in editor and can create their own third party widgets.
Blogger VS wordpress: which blogging platform is better?
Users who are new and want to create blog first they should create on blogger. As it provides good user friendly interface like coming to layout it is good to insert the widget or can also add the third party code into the layout it is easy task to implement.Also if you increase your like on languages like HTML, CSS and JavaScript you can play it with blogger where as in wordpress the beginners not able to code as it is coded with php script. If you want to save money on hosting then use BlogSpot platform, as the hosting in BlogSpot platform is completely free only thing is you should buy custom domain and link it to the blogger through the dashboard.
|
|
|
|
|
Free To Create Sub domains like
(example.blogspot.com)
|
Free To Create Sub domains
like (example.wordpress.com)
|
Coding in Editor is easy( only
need to have basics in HTML, CSS & javascript)
|
Coding in editor is difficult unless if you have good coding skills
like PHP
|
Support form is there but limited members are available .
|
Support form with large number of members can get solution with in
minutes.
|
Widgets(Limited no of widgets)
|
Plugins(large number of widgets)
|
We can create Third party widgets
|
In wordpress also we create own plugins and we can add
|
Right choice for new users
|
Perfect Choice for users who already used blogger platform and want
to do real business
|
Easy way to add custom domain
through the dashboard.
|
Not an easy task for new users who want to add new domain with
wordpress
|
Conclusion:
Every user who uses internet want to create the blog on BlogSpot or wordpress but for newbies the BlogSpot is better if you want to make real business then wordpress is best as it has bunch of features. Choice is yours but if you are blogging for the first time then you should touch BlogSpot blog once then you know how the blog looks and then you can do migration it to wordpress. BlogSpot is also great platform for blogging but it has limited features. If it is wordpress or BlogSpot you can create your own sub domain for free.
Blogger is the best platform for beginners and using blogger.com the users can create the free blog i.e. BlogSpot to share their content, pictures. To change your present blog design you can upload a template in your blogger blog. And you can also create or modify your existing template. Blogger supports .xml extension templates. I will explain step by step method to upload template in blogger.
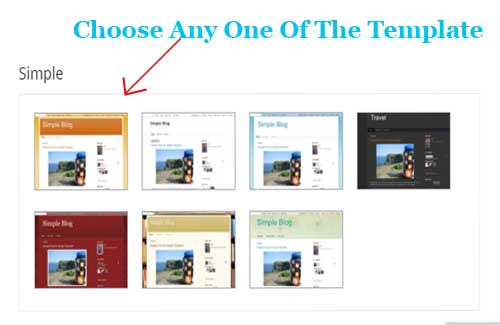
- Select the templates which are provided by the blogger.
Like above they are simple and easier to understand for beginners. But these kinds of templates are mainly used by persons who want to share their happenings in their life. But if you want to develop the blog for commercial or business purpose you should upload a free premium blogger template or if you have coding knowledge you can create your own blogger template.
Follow below methods to upload template in blogger
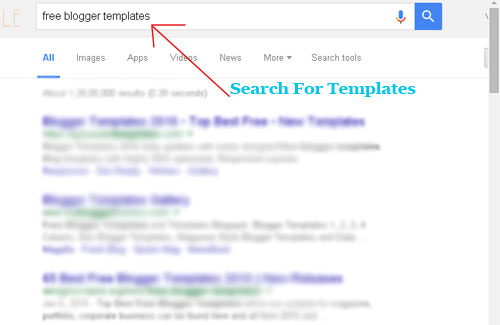
- First search any free premium templates in Google. There are many websites which provide free blogger templates.
- Now download the template. After downloading the file will be in zip format. Then left click on the file and choose “Extract File” option. After completing extraction you can view the file which will be in .XML format.
- Go to blogger.com Enter your email address and password.
- After successful sign-in you may see your list of blogs.Select the blog which you want to upload the template.
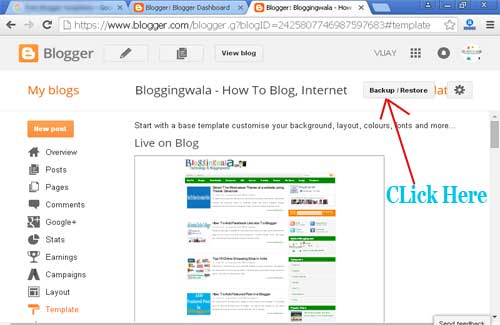
- And click on Backup/restore.
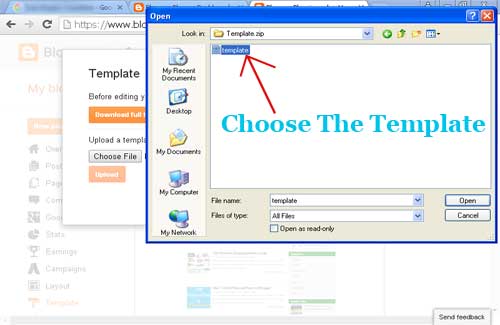
- Now choose the template which is in the xml format.
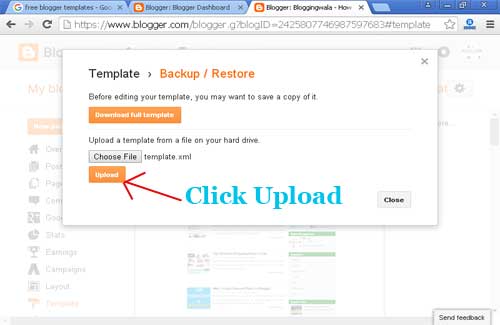
- After selecting the file click upload.
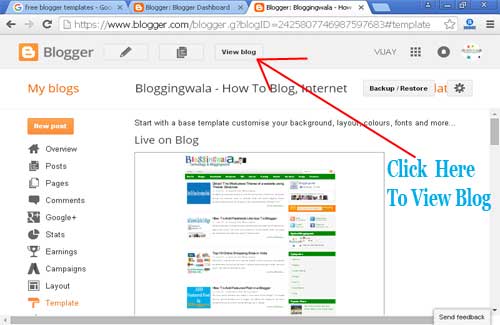
- Using the above methods now you are successfully uploaded a new template on your blog. Now you can view your blog by clicking view blog option present on the top of your blogger dashboard.
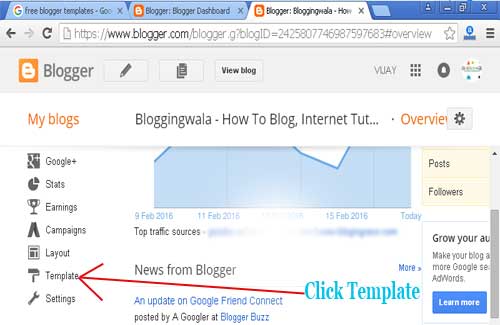
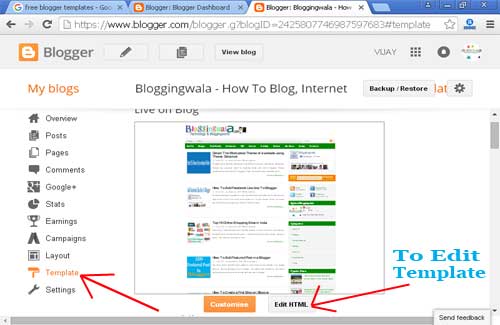
- To modify or edit the latest uploaded template you should click template and then choose edit template. In this you can view your complete website code.
Note:
While uploading any template make sure first save your previous template. This can be done by clicking restore/backup and then click download template.
Conclusion:
Follow the above steps clearly while uploading template in blogger. I hope the above tutorial is easier to understand. If you receive any errors while uploading the template it is due to the errors in the template. And choose the error free template so that you won’t find any errors in future while accessing your blog.
vijaykumar
at February 23, 2016
Blogger is the best platform for beginners and using blogger.com the users can create the free blog i.e. BlogSpot to share their content, pictures. To change your present blog design you can upload a template in your blogger blog. And you can also create or modify your existing template. Blogger supports .xml extension templates. I will explain step by step method to upload template in blogger.
- Select the templates which are provided by the blogger.
Like above they are simple and easier to understand for beginners. But these kinds of templates are mainly used by persons who want to share their happenings in their life. But if you want to develop the blog for commercial or business purpose you should upload a free premium blogger template or if you have coding knowledge you can create your own blogger template.
Follow below methods to upload template in blogger
- First search any free premium templates in Google. There are many websites which provide free blogger templates.
- Now download the template. After downloading the file will be in zip format. Then left click on the file and choose “Extract File” option. After completing extraction you can view the file which will be in .XML format.
- Go to blogger.com Enter your email address and password.
- After successful sign-in you may see your list of blogs.Select the blog which you want to upload the template.
- And click on Backup/restore.
- Now choose the template which is in the xml format.
- After selecting the file click upload.
- Using the above methods now you are successfully uploaded a new template on your blog. Now you can view your blog by clicking view blog option present on the top of your blogger dashboard.
- To modify or edit the latest uploaded template you should click template and then choose edit template. In this you can view your complete website code.
Note:
While uploading any template make sure first save your previous template. This can be done by clicking restore/backup and then click download template.
Conclusion:
Follow the above steps clearly while uploading template in blogger. I hope the above tutorial is easier to understand. If you receive any errors while uploading the template it is due to the errors in the template. And choose the error free template so that you won’t find any errors in future while accessing your blog.
To detect WordPress theme you should follow the below instructions. Wordpress themes are popularly used by websites today and many bloggers choose wordpress as best option for blogging. There are many themes available which are provided by the premium developers. Daily I surf many websites and many of them are wordpress and if I like theme I used to check the theme using theme detector and also using other option. So like me if you also want to check the themes of the wordpress sites which you have visited so you should follow the above methods to detect the wordpress themes.
1st Method:
We may have an idea of viewing the source codes of websites. If you won’t know about this just visit any website and just hold the ctrl+U keys in the keyboards. And hold ctrl+U from the keyboard and type wp-content/themes, then you can view the theme name in the section of this is the good method and also fastest method but many of the website hide this method.
2nd Method:
By this method you can view the premium theme of the wordpress sites even though they are hided by the website owners. Just type the website URL in the box provided in this website and the detector will take some time and within seconds you can able to know the theme of any wordpress website. Not only theme but also you can view the premium plug-ins used by those sites. Not only knowing theme you can also have link to the website so if you want to know they are redirected to the premium theme developer sites.
With the above methods you cannot find the custom theme developed by the developers but if they have own market in wordpress themes and if they are able to buy, so you able to find those themes but you cannot detect custom themes by this methods. There are other methods also available to detect the wordpress theme like this chrome extension helps you to detect the wordpress theme.
vijaykumar
at January 25, 2016
To detect WordPress theme you should follow the below instructions. Wordpress themes are popularly used by websites today and many bloggers choose wordpress as best option for blogging. There are many themes available which are provided by the premium developers. Daily I surf many websites and many of them are wordpress and if I like theme I used to check the theme using theme detector and also using other option. So like me if you also want to check the themes of the wordpress sites which you have visited so you should follow the above methods to detect the wordpress themes.
1st Method:
We may have an idea of viewing the source codes of websites. If you won’t know about this just visit any website and just hold the ctrl+U keys in the keyboards. And hold ctrl+U from the keyboard and type wp-content/themes, then you can view the theme name in the section of this is the good method and also fastest method but many of the website hide this method.
2nd Method:
By this method you can view the premium theme of the wordpress sites even though they are hided by the website owners. Just type the website URL in the box provided in this website and the detector will take some time and within seconds you can able to know the theme of any wordpress website. Not only theme but also you can view the premium plug-ins used by those sites. Not only knowing theme you can also have link to the website so if you want to know they are redirected to the premium theme developer sites.
With the above methods you cannot find the custom theme developed by the developers but if they have own market in wordpress themes and if they are able to buy, so you able to find those themes but you cannot detect custom themes by this methods. There are other methods also available to detect the wordpress theme like this chrome extension helps you to detect the wordpress theme.